
Melt-in-Your-Mouth Sponge Cake: A Timeless Recipe Everyone Will Adore
Few desserts can match the simple perfection of a sponge cake.
With its light, airy texture, subtle sweetness, and versatile nature, sponge cake has earned a special place at the table across cultures and generations. Whether dressed up with rich toppings or enjoyed plain with a cup of tea, a beautifully made sponge cake is a testament to the magic of basic ingredients and thoughtful technique.
This recipe for Melt-in-Your-Mouth Sponge Cake captures everything that makes sponge cake a beloved classic. Crafted with everyday ingredients and straightforward methods, the result is a cake so tender, so fluffy, and so delicious that it practically disappears the moment it hits the tongue.
Perfect for birthdays, celebrations, afternoon tea, or simply whenever the craving for something sweet and light strikes.
The Timeless Appeal of Sponge Cake
The origins of sponge cake stretch back centuries, tracing roots to the Renaissance era, when European bakers first began to create cakes that were leavened without yeast. Unlike heavy, dense breads of earlier times, sponge cake represented a new, luxurious texture—one that celebrated airiness and delicate crumb.
Throughout history, variations of sponge cake have flourished. From the British Victoria sponge layered with jam and cream to the Japanese kasutera and Italian pan di Spagna, each culture has embraced its own version, often adapting to local tastes and traditions.
At the heart of all these variations is the same beautiful principle: simple ingredients transformed into something extraordinary through careful technique.
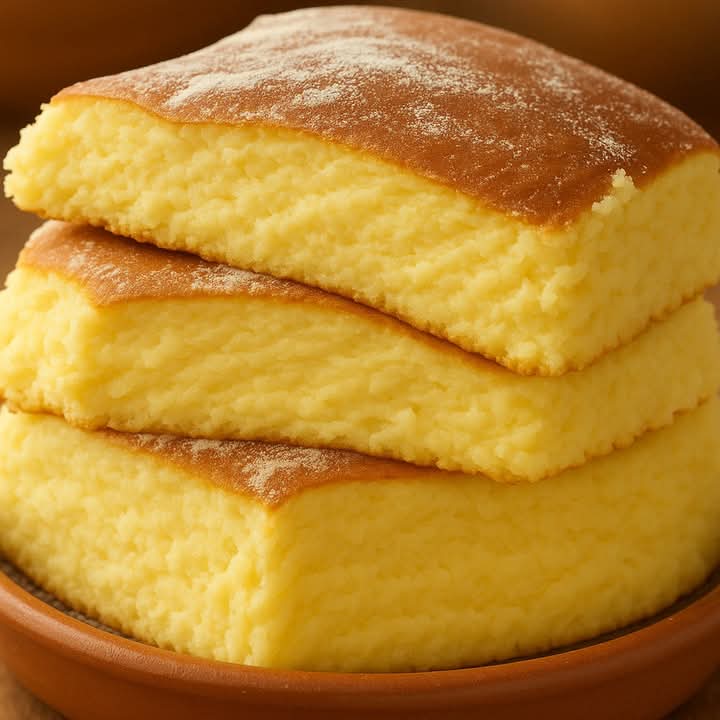
This melt-in-your-mouth version highlights everything that makes sponge cake irresistible: soft, cloud-like texture; a hint of sweetness; and endless possibilities for flavoring and serving.
Essential Ingredients for Success
Creating the perfect sponge cake starts with understanding the role of each ingredient:
- Eggs (4 large): Eggs are the backbone of a sponge cake. When beaten, they incorporate air that lifts and lightens the batter, giving the cake its signature rise without the need for heavy leavening agents.
- Sugar (1 cup): Provides sweetness, but also stabilizes the whipped eggs, helping them retain their volume.
- All-Purpose Flour (1 cup): Sifted flour keeps the crumb tender and light. Measuring accurately is key—too much flour can weigh down the batter.
- Milk (½ cup): Adds moisture, ensuring the cake isn’t dry or crumbly.
- Melted Butter (½ cup): Offers richness and depth of flavor, balancing the lightness of the crumb with satisfying mouthfeel.
- Baking Powder (1 teaspoon): While traditional sponge cakes often rely solely on whipped eggs for lift, a touch of baking powder ensures a consistent, reliable rise.
- Lemon Zest (optional): A whisper of lemon zest brightens the flavor profile, adding a subtle freshness without overwhelming the cake’s delicate nature.
Each ingredient, though simple, plays a vital role. When treated with care, they combine to create a sponge cake that is nothing short of magical.
Equipment Checklist
Having the right tools makes the process smoother and ensures the best results:
- Mixing bowls
- Electric mixer or sturdy hand whisk
- Fine-mesh sifter
- Rubber spatula
- 9-inch round or square cake pan
- Parchment paper
- Cooling rack
For those without an electric mixer, whipping the eggs and sugar by hand is entirely possible, though it requires a bit more patience and elbow grease.
Step-by-Step Instructions
Step 1: Preheat the Oven and Prepare the Pan
Begin by preheating the oven to 180°C (350°F).
Grease the cake pan with a thin layer of butter, then dust it lightly with flour. Alternatively, lining the base with parchment paper guarantees easy removal after baking, ensuring the delicate sponge stays intact.
Preparation Tip: Properly greasing and lining the pan is crucial. Sponge cake batter is delicate and can stick easily if the pan isn’t well-prepared.
Step 2: Whip the Eggs and Sugar
In a large bowl, combine the eggs and sugar.
Using an electric mixer on medium-high speed, beat for 5–7 minutes until the mixture becomes pale, thick, and fluffy.
When lifted, the batter should fall from the beaters in a thick ribbon that briefly sits on the surface before dissolving back into the bowl.
This is one of the most important steps, as the air incorporated here is what gives the sponge its remarkable lightness.
Step 3: Add Milk and Melted Butter
Gently pour in the milk and melted butter.
Fold them into the egg mixture with care, using slow, sweeping motions.
The goal is to incorporate these liquids without deflating the precious air bubbles beaten into the eggs.
Mixing Tip: It’s better to leave a few small streaks rather than over-mix. Over-mixing can knock out the air and lead to a heavy cake.
Step 4: Sift and Fold in Dry Ingredients
Sift the flour and baking powder together over the wet mixture.
Using a spatula, fold the dry ingredients into the batter in stages, maintaining a light hand.
If using lemon zest, it can be gently stirred in at this point.
This step transforms the airy egg-sugar foam into a cohesive, pourable batter while preserving its buoyant structure.
Step 5: Bake Until Golden and Set
Transfer the batter to the prepared cake pan, smoothing the top gently.
Bake in the center of the oven for 30–35 minutes, or until the cake is golden on top and a toothpick inserted into the center comes out clean.
Resist the temptation to open the oven door too early. Sudden changes in temperature can cause the sponge to collapse.
Step 6: Cool and Serve
Allow the sponge cake to cool in the pan for about 10 minutes, then carefully turn it out onto a cooling rack to cool completely.
Once cooled, the cake can be enjoyed plain or dressed up with toppings, fillings, or glazes to suit any occasion.
Serving Suggestions
One of the beauties of sponge cake is its versatility.
It can be as simple or as sophisticated as the moment calls for:
- Lightly Dusted: A simple dusting of powdered sugar keeps the cake looking elegant and lets the flavor shine.
- Layered with Cream: Slice the cake horizontally and fill it with whipped cream and sliced strawberries or raspberries.
- Glazed with Lemon: Drizzle with a tangy lemon glaze for a bright, refreshing finish.
- Frosted with Ganache: For a richer dessert, cover the sponge with silky chocolate ganache.
- Topped with Fresh Fruit: Arrange a colorful assortment of fresh fruits on top for a vibrant, summery treat.
No matter how it’s served, the airy crumb and tender bite remain the star of the show.
Creative Variations
Sponge cake offers a perfect blank canvas for creativity.
Here are some ideas for tailoring the basic recipe to different moods and occasions:
Classic Vanilla Sponge
Add a teaspoon of high-quality vanilla extract to the batter for a classic, comforting flavor.
Chocolate Sponge
Replace ¼ cup of the flour with unsweetened cocoa powder to create a deep, chocolaty variation that pairs beautifully with berries or cream.
Citrus Burst
Double the amount of lemon zest or substitute with orange or lime zest. Finish with a citrus glaze for an extra zesty punch.
Nutty Delight
Fold a handful of finely chopped almonds, walnuts, or pistachios into the batter.
Top with more nuts before baking for a delightful crunch.
Coconut Dream
Substitute half the milk with coconut milk and sprinkle shredded coconut on top before baking.
Perfect for tropical-themed desserts.
Expert Tips for Sponge Cake Success
Achieving the ideal sponge cake is all about technique.
Here are some professional tips to ensure a flawless result every time:
- Room Temperature Ingredients: Cold eggs or milk can shock the batter and prevent it from reaching full volume.
- Beat Eggs Thoroughly: Underbeaten eggs mean less structure; overbeaten eggs can lead to a coarse crumb.
- Sift Dry Ingredients: Sifting aerates the flour and prevents lumps, ensuring a smooth, light batter.
- Fold, Don’t Stir: Folding gently is key to maintaining the airiness critical for a tender sponge.
- Work Quickly: Once the batter is ready, bake it promptly. Delays can cause the batter to lose its volume.
- Check for Doneness: Use a toothpick inserted into the center. If it comes out clean, the cake is ready.
- Cool Properly: Allow the cake to cool slightly before removing it from the pan to avoid tearing.
Common Mistakes and How to Avoid Them
Understanding potential pitfalls can help prevent disappointment:
- Sinking Cake: Often caused by underbaking or opening the oven door too soon.
- Dense Texture: Results from over-mixing, insufficient whipping of eggs, or too much flour.
- Dry Sponge: Overbaking or using too little liquid can dry out the cake.
Watch baking time carefully. - Sticky Top: Indicates the cake was removed from the pan too soon before setting properly.
Each step, from whipping to baking to cooling, plays an important role in achieving the ideal texture and flavor.
A Short History of Sponge Cake
Sponge cake has a rich and fascinating history, evolving across continents and cultures.
The earliest known sponge cakes were made without chemical leaveners like baking powder. Instead, bakers relied on the manual whipping of eggs to introduce air into the batter—a testament to the skill and patience required.
By the 18th century, recipes for sponge cakes began appearing in English cookbooks, and the cake quickly became popular among European nobility. The lightness and refinement of sponge cakes made them perfect companions for the elaborate afternoon teas of the Victorian era.
In modern times, sponge cakes continue to be a symbol of simplicity and elegance. Whether part of a grand wedding cake, a festive birthday treat, or a quiet afternoon indulgence, sponge cake remains a cherished favorite worldwide.
How to Store and Freeze Sponge Cake
Proper storage preserves the delicate texture and flavor of sponge cake:
- Room Temperature: Store the cake in an airtight container at room temperature for up to 2 days.
- Refrigerator: Wrapped well, sponge cake can last up to 5 days in the fridge. Allow to come to room temperature before serving.
- Freezing: Wrap the cooled cake tightly in plastic wrap and place in a freezer-safe bag. Freeze for up to 2 months. Thaw at room temperature before enjoying.
For best results, if planning to freeze, do so before adding any fresh fruit or cream toppings.
Nutritional Information (Per Serving)
- Calories: Approximately 260–280
- Carbohydrates: 32g
- Fat: 12g
- Protein: 4g
- Sugar: 22g
- Fiber: 1g
Values are approximate and can vary based on toppings or variations used.
Final Thoughts
There’s something truly magical about a dessert made with just a handful of basic ingredients, transformed into something ethereal through technique and care.
This Melt-in-Your-Mouth Sponge Cake captures the very essence of home baking: warmth, simplicity, and pure deliciousness.
Perfect for birthdays, holidays, special occasions, or everyday indulgence, this timeless sponge cake is a staple recipe to treasure and return to again and again.
Its delicate crumb, moist texture, and endless adaptability make it a favorite across generations.
Whether enjoyed plain, filled with fruit and cream, or dressed with luscious frosting, one thing is certain: every slice delivers pure joy.