
Walking Taco Casserole: The Ultimate Comfort Food Twist on a Classic Favorite
If you’ve ever craved the messy, delicious fun of a walking taco but wanted something more substantial, shareable, and oven-baked, then this Walking Taco Casserole is about to become your new go-to recipe. Picture this: layers of perfectly seasoned ground beef, hearty black beans and sweet corn, tangy salsa, creamy sour cream, and gooey melted cheese, all topped with that irresistible crunch of crushed Fritos or Doritos. It’s the best parts of taco night transformed into a cozy, crowd-pleasing casserole that’s perfect for busy weeknights, game days, potlucks, family gatherings, or even meal prep.
This dish draws inspiration from the beloved walking taco (also known as a “taco in a bag” or its cousin, the Frito pie), a portable snack where taco fixings are piled into a single-serving bag of corn chips. But instead of eating on the go, this casserole version brings everyone together around the table—no individual bags required, and way less mess!
In this detailed guide, we’ll walk through everything you need to know: the full expanded recipe, step-by-step instructions, pro tips for success, delicious variations, make-ahead and freezing options, serving suggestions, nutritional insights, and why this recipe deserves a permanent spot in your rotation. Get ready—this one’s a keeper!
What Exactly Is a Walking Taco Casserole?
At its core, a walking taco casserole is a baked Tex-Mex masterpiece that captures the essence of classic tacos while incorporating the signature crunch of corn chips. Unlike traditional tacos served in shells or the original walking taco served straight from a chip bag, this casserole layers everything into a 9×13-inch dish for easy serving and maximum flavor in every bite.
The beauty lies in its simplicity: basic pantry staples come together quickly, yet the result feels indulgent and festive. It’s hearty enough to satisfy big appetites, customizable for picky eaters, and always a hit with kids and adults alike. Think of it as a deconstructed taco bake with an extra layer of fun.
A Quick History: From Frito Pie to Walking Taco Casserole
The roots of this dish trace back to the iconic Frito pie, a Southern and Southwestern American classic with disputed origins. Some credit Texas in the 1930s or 1940s, where Daisy Doolin (mother of Fritos founder C.E. Doolin) reportedly topped corn chips with chili, cheese, and onions. Others point to New Mexico, where vendors at places like the Five and Dime on the Santa Fe Plaza popularized a similar creation in the 1950s or 1960s using red chile, beans, and Fritos.
By the 1980s and 1990s, the concept evolved in the Midwest into the walking taco—often made with taco-seasoned meat instead of chili, served in a crushed bag of Fritos or Doritos for portability at fairs, sports events, and school fundraisers. Names vary regionally: “Frito boat,” “taco in a bag,” or even “pepper bellies” in parts of California.
The casserole adaptation is a modern, home-cook-friendly evolution. It ditches the single-serve bag for a family-style bake, making it easier to prepare ahead, feed a crowd, and enjoy without the mess. It’s the perfect marriage of nostalgia and convenience!
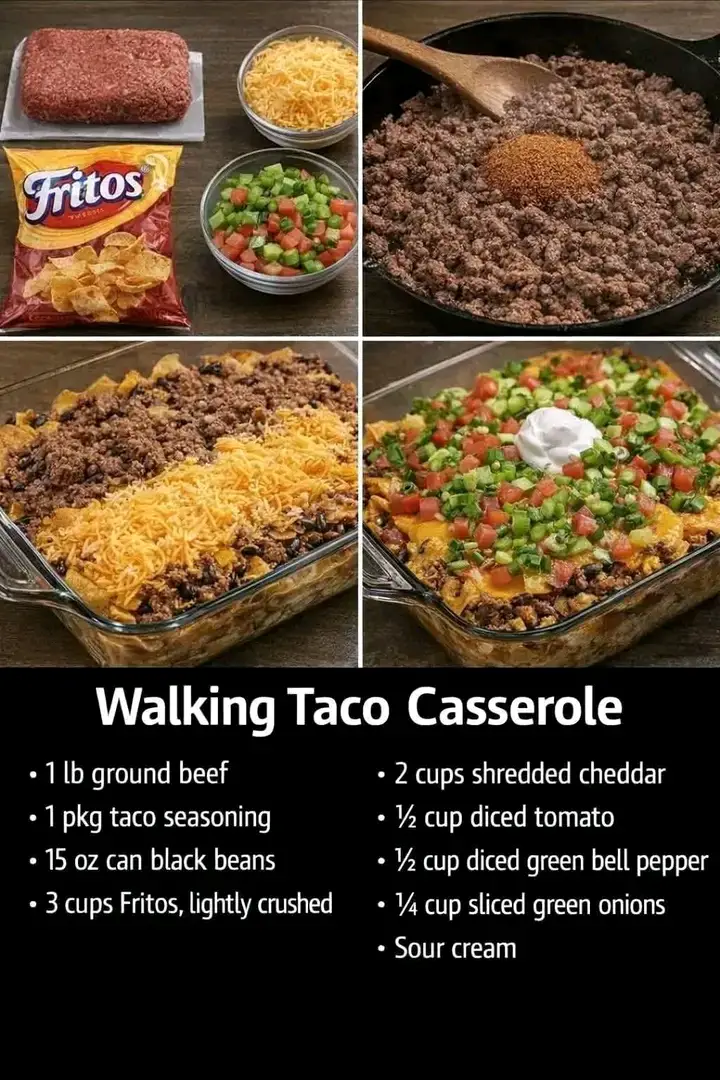
Ingredients (Serves 8-10 Generously)
This recipe builds on the classic version you shared, with a few enhancements for extra flavor and texture while keeping it simple.
For the Base:
- 1 lb lean ground beef (85-90% lean works best to avoid excess grease)
- 1 medium onion, finely diced (about 1 cup)
- 1 packet (1 oz) taco seasoning (or homemade—see variation section)
- 1 cup salsa (medium or hot, depending on spice preference)
- 1 can (15 oz) black beans, drained and rinsed
- 1 can (15 oz) corn, drained (or 1 ½ cups frozen corn, thawed)
- ½ cup water (to help blend the seasoning)
For the Creamy Layer:
- 1 cup sour cream (full-fat for richness, or light for a lighter version)
- Optional: 4 oz cream cheese, softened (for extra creaminess)
For Assembly:
- 2-3 cups shredded cheddar cheese, Mexican blend, or pepper jack (divided)
- 1 large bag (9-12 oz) Fritos corn chips or Doritos (Nacho Cheese or Cool Ranch for fun twists), lightly crushed (reserve some for topping)
Optional but Recommended Toppings (Serve on the Side):
- Diced fresh tomatoes
- Shredded lettuce
- Sliced green onions
- Pickled or fresh jalapeños
- Sliced black olives
- Chopped cilantro
- Extra salsa or pico de gallo
- Guacamole or diced avocado
- Lime wedges for squeezing
Step-by-Step Instructions
Prep Time: 15 minutes
Cook Time: 25-30 minutes
Total Time: About 45 minutes
- Preheat the Oven
Set your oven to 350°F (175°C). Lightly grease a 9×13-inch baking dish with cooking spray or butter. This prevents sticking and makes cleanup a breeze. - Cook the Ground Beef
In a large skillet over medium-high heat, add the ground beef and diced onion. Cook, breaking up the meat with a wooden spoon, until the beef is browned and no longer pink, about 6-8 minutes. Drain excess fat if needed (especially if using higher-fat beef). - Season the Meat
Reduce heat to medium. Stir in the taco seasoning packet and ½ cup water. Mix well and simmer for 2-3 minutes until thickened. Add the salsa, drained black beans, and drained corn. Stir everything together and let it simmer for another 3-5 minutes. Taste and adjust seasoning—add salt, pepper, or extra chili powder if desired. - Prepare the Creamy Element
In a small bowl, mix the sour cream (and softened cream cheese, if using) until smooth. This creates a tangy, creamy layer that balances the spice. - Layer the Casserole
Spread half of the crushed Fritos or Doritos in the bottom of the prepared baking dish for a crunchy base.
Spoon the entire beef mixture evenly over the chips.
Dollop the sour cream mixture over the beef and gently spread it out.
Sprinkle 1 ½–2 cups of shredded cheese over the top.
Finish with the remaining crushed chips and a final layer of cheese for that golden, melty finish. - Bake
Cover the dish with foil and bake for 15 minutes. Remove the foil and bake another 10-15 minutes, until the cheese is bubbly, melted, and lightly golden around the edges. - Rest and Serve
Let the casserole rest for 5-10 minutes before serving—this helps it set. Scoop generous portions onto plates and let everyone pile on their favorite fresh toppings. Serve hot!
Pro Tips for the Best Results
- Crunch Control — Chips soften during baking, which is part of the charm (like nachos). For maximum crunch, serve extra whole chips on the side or add them only as a final topping after baking.
- Cheese Choices — A Mexican blend melts beautifully, but sharp cheddar adds tang, and pepper jack brings heat.
- Make It Less Spicy — Use mild salsa and skip jalapeños for kids.
- Drain Well — Rinse beans and drain corn thoroughly to avoid a watery casserole.
- Lean Protein — Ground turkey or chicken works great as a lighter swap.
- Stale Chips? — Slightly stale chips hold up better in the bake—perfect for using up pantry odds and ends!
Delicious Variations to Try
- Doritos Upgrade — Use Nacho Cheese Doritos for cheesier flavor or Cool Ranch for a zesty twist.
- Vegetarian Version — Skip the meat and double the beans. Add sautéed bell peppers and mushrooms.
- Spicy Kick — Stir in diced jalapeños, hot sauce, or use spicy taco seasoning.
- Extra Veggies — Layer in diced bell peppers, zucchini, or spinach for hidden nutrition.
- Homemade Taco Seasoning — Mix 1 tbsp chili powder, 1 tsp cumin, 1 tsp garlic powder, 1 tsp onion powder, ½ tsp paprika, salt, and pepper.
- Layered Like Lasagna — Double the layers for an even more dramatic bake.
Make-Ahead, Storage, and Freezing
This casserole shines as a make-ahead meal!
- Make Ahead — Prepare the beef mixture up to 2 days in advance and refrigerate. Assemble just before baking to keep chips crisp.
- Leftovers — Store in an airtight container in the fridge for 3-4 days.
- Reheating — Oven at 350°F covered with foil for 15-20 minutes. Microwave works but softens chips.
- Freezer-Friendly — Assemble without chips (they get soggy). Freeze the meat/cheese/sour cream layers in a foil pan for up to 3 months. Thaw overnight, add fresh chips, and bake (add 10 minutes to time).
Serving Suggestions and Pairings
Serve this casserole family-style with a side salad, Mexican rice, or refried beans. For a full fiesta:
- Fresh green salad with lime vinaigrette
- Elote (Mexican street corn)
- Chilled margaritas or agua fresca
- Chips and guac as a starter
It’s perfect for potlucks—bake ahead, cover, and transport easily.
Nutrition Highlights (Per Serving, Approximate)
Around 500-600 calories, with good protein (20-25g), fiber from beans, and satisfying fats. It’s indulgent but balanced—use lean meat and light sour cream to lighten it up.
Walking Taco Casserole isn’t just food; it’s a vibe—comforting, fun, and full of flavor. Once you make it, expect requests for seconds (and the recipe!). Don’t lose this one—it’s too good to forget. Enjoy every crunchy, cheesy bite!