
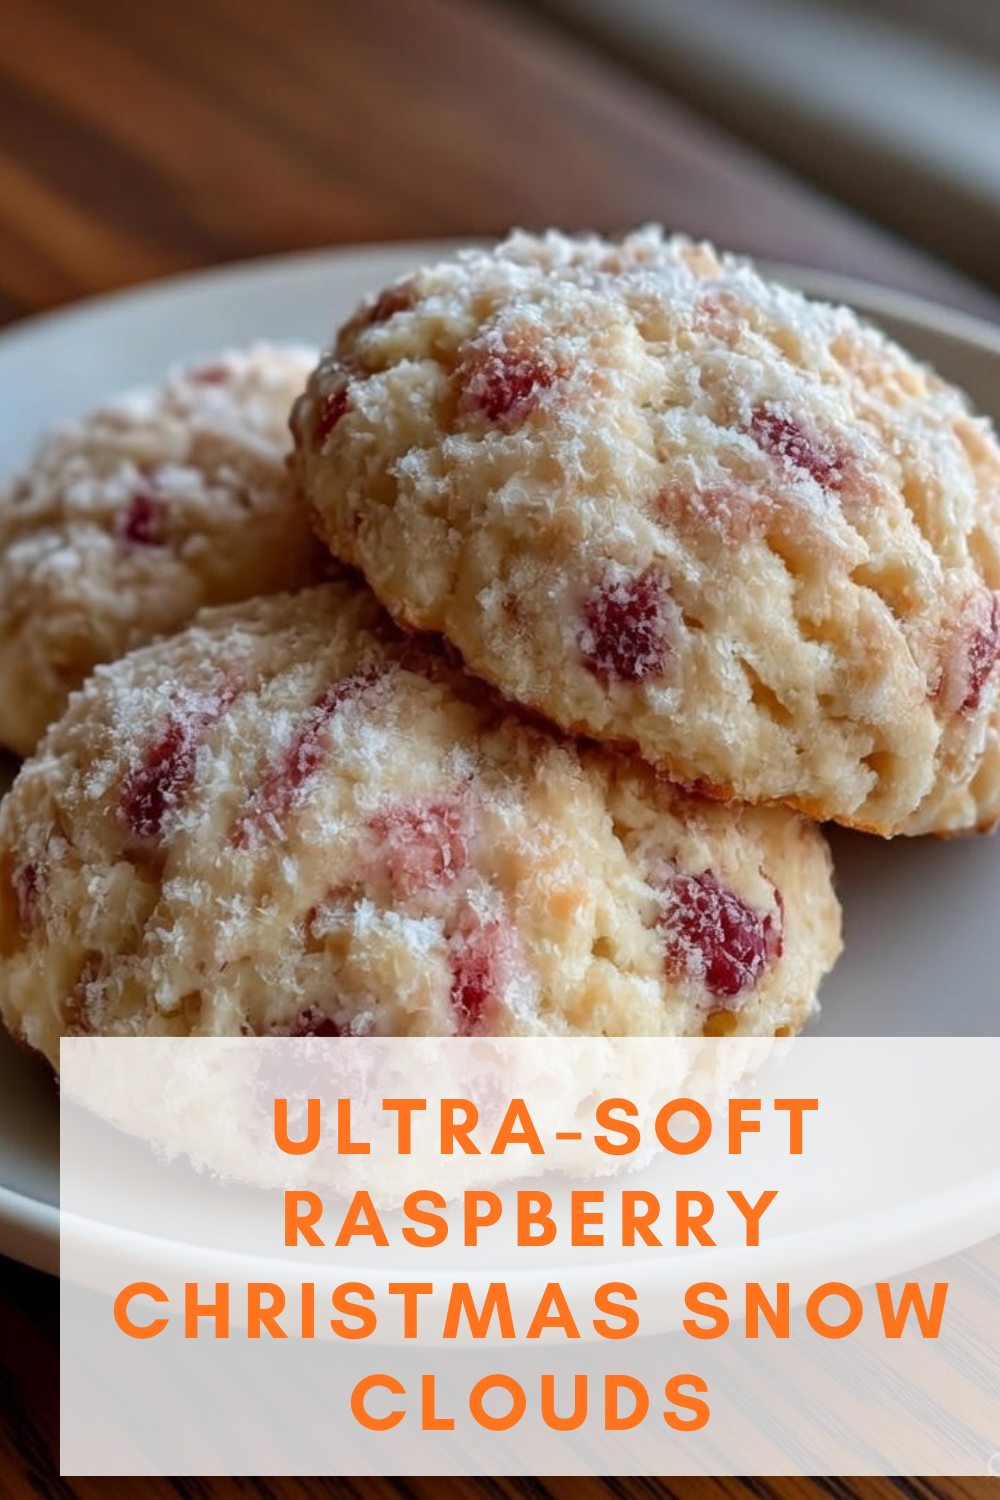
☁️💖 Ultra-Soft Raspberry Christmas Snow Clouds
Prep Time: 20 minutes
Chill Time: 30–60 minutes
Bake Time: 10–12 minutes per batch
Total Time: Approximately 60–90 minutes
Yield: 20–24 delicate, melt-in-your-mouth cookies
These Ultra-Soft Raspberry Christmas Snow Clouds are a dreamy holiday treat that combines the buttery tenderness of classic snowball cookies with the bright, tangy burst of fresh raspberries. Dusted generously with powdered sugar, they resemble fluffy snow clouds with a subtle pink hue peeking through—perfect for Christmas cookie platters, gift boxes, or cozy winter evenings by the fire. The raspberries add a natural fruity pop that elevates the traditional recipe, making these cookies irresistibly soft, slightly chewy, and utterly addictive.
Why You’ll Love These Raspberry Snow Cloud Cookies
Imagine biting into a cookie that’s incredibly soft and almost cloud-like in texture, with pockets of juicy raspberry that release a sweet-tart flavor against the rich, vanilla-scented dough. The heavy cream in the recipe ensures an ultra-tender crumb, while the crushed fresh raspberries infuse natural color and moisture without overpowering the delicacy.
These cookies stand out for several reasons:
- Festive and Beautiful: The thick layer of powdered sugar creates a snowy, whimsical appearance, with faint rosy undertones from the berries that evoke holiday cheer.
- Easy to Make: The process is straightforward, requiring no fancy equipment—just basic kitchen tools and a bit of patience for chilling.
- Perfect for Gifting: Their sturdy yet tender texture makes them ideal for packaging in tins or boxes without crumbling.
- Customizable: You can tweak flavors easily to suit your preferences, from adding extracts to incorporating subtle mix-ins.
- Unique Twist on a Classic: They offer a fresh, fruity alternative to nut-heavy traditional snowballs, appealing to those who love berry desserts.
Unlike denser, nut-filled snowball cookies that rely on pecans or almonds for texture, this version keeps things light and fruit-forward. The result is a softer, more modern cookie that’s especially welcoming during the holiday season when fresh (or frozen) berries can bring a touch of summer brightness to winter baking.
A Deeper Look at the History of Snowball Cookies
Snowball cookies, known by many names around the world, have a rich and multicultural backstory that makes them a timeless holiday favorite.
Their origins can be traced to medieval Arab confections made with butter, sugar, and ground nuts—luxurious treats that traveled along trade routes to Europe. As these recipes spread to Spain, they evolved into “polvorones,” shortbread-like cookies that crumble into powder (hence the name, from “polvo” meaning dust). These were often enjoyed at special occasions, including weddings.
When Spanish influences reached Mexico, polvorones became a staple at celebrations, earning the moniker “Mexican wedding cookies.” In the United States, similar cookies appeared under the name “Russian tea cakes,” possibly inspired by European tea traditions where small, rich pastries accompanied hot beverages.
The “snowball” name emerged naturally from their appearance: round, pale cookies rolled in powdered sugar to mimic fresh snow. During the 20th century, they became a Christmas staple in American households, often baked in large batches for cookie exchanges.
This raspberry variation represents a contemporary evolution. While some recipes use raspberry jam for a filled center, incorporating crushed fresh berries directly into the dough provides even flavor distribution, natural coloring, and extra moisture for softness. It’s a delightful way to infuse holiday baking with vibrant fruit notes, aligning perfectly with Christmas themes of red berries and white snow.
Key Ingredients: Breakdown, Substitutions, and Expert Tips
The beauty of this recipe lies in its simplicity—mostly pantry staples enhanced by fresh fruit. Here’s a detailed look at each ingredient and why it matters:
- 1 1/2 cups (180g) all-purpose flour: The foundation for structure. Measuring correctly (spoon and level method) prevents dense cookies.
- 1 teaspoon baking powder: Provides just enough lift to keep the cookies light and airy, differentiating them from denser shortbreads.
- 1/4 teaspoon salt: A small amount balances sweetness and enhances overall flavor.
- 3/4 cup (150g) granulated sugar: Adds sweetness without overwhelming the delicate raspberry notes.
- 1/2 cup (113g) unsalted butter, softened to room temperature: Contributes richness and tenderness. High-quality butter yields the best flavor.
- 1 large egg: Acts as a binder, adding moisture and helping the dough hold together.
- 2 tablespoons heavy cream: The secret ingredient for ultra-soft texture—it enriches the dough and prevents dryness.
- 1/2 cup crushed fresh raspberries (from about 1 cup whole berries): The highlight! Fresh berries provide authentic tart-sweet flavor and natural pink tint.
- 1 teaspoon pure vanilla extract: Adds warm, aromatic depth that complements the fruit.
- Powdered sugar (1–2 cups for dusting): Essential for the signature snowy exterior and extra sweetness.
Substitutions for Dietary Needs or Availability:
- Berries: Frozen raspberries work well (do not thaw first to avoid excess liquid). Other berries like strawberries or blackberries can substitute, though flavors will shift.
- Dairy-Free: Use plant-based butter and full-fat coconut milk or cream alternative.
- Egg-Free: A flax egg (1 tbsp ground flax + 3 tbsp water) can bind, though texture may be slightly denser.
- Gluten-Free: A quality 1:1 gluten-free flour blend usually performs well.
- Flavor Enhancements: Add 1/2 teaspoon almond extract for a classic raspberry-almond pairing, or lemon zest for brightness.
Expert Tips on Ingredients:
- Choose ripe, flavorful raspberries for the best taste impact.
- If berries are very juicy, gently pat them dry after crushing to control dough moisture.
- Room-temperature ingredients (especially butter and egg) ensure smooth creaming and even incorporation.
Detailed Step-by-Step Instructions
For flawless results, follow these expanded steps with built-in tips and troubleshooting advice.
- Prepare the Dry Ingredients
In a medium bowl, thoroughly whisk together the all-purpose flour, baking powder, and salt. This step distributes the leavening evenly and removes any lumps. Set the bowl aside while you prepare the wet components. - Cream the Butter and Sugar
In a large mixing bowl, beat the softened butter and granulated sugar with an electric mixer on medium speed for 3–5 minutes until the mixture is pale, fluffy, and light. This aeration is crucial for tender cookies. Stop to scrape down the bowl sides occasionally. - Incorporate the Egg, Vanilla, and Cream
Add the egg, vanilla extract, and heavy cream. Beat on medium speed until fully integrated and the mixture looks smooth and creamy—about 1–2 minutes. Overbeating here can toughen the dough, so stop once combined. - Add the Dry Ingredients Gradually
With the mixer on low speed, add the flour mixture in two or three additions. Mix just until the dough comes together and no dry streaks remain. Overmixing develops gluten, leading to tougher cookies. - Gently Fold in the Crushed Raspberries
First, crush the fresh raspberries with a fork or potato masher until juicy but still chunky. Use a rubber spatula to fold them into the dough delicately. Turn the dough over itself rather than stirring vigorously to preserve berry pieces and avoid overworking. The dough will turn a soft pink and become slightly sticky—this is expected. Moisture Management Tip: If the dough seems too wet, refrigerate it immediately or sprinkle in 1–2 tablespoons extra flour. - Chill the Dough Thoroughly
Cover the bowl with plastic wrap or transfer dough to an airtight container. Refrigerate for at least 30 minutes, preferably 45–60 minutes. Chilling firms the butter, making shaping easier and preventing excessive spreading during baking. - Preheat the Oven and Shape the Cookies
Preheat your oven to 375°F (190°C) and line baking sheets with parchment paper or silicone mats.
Using a small cookie scoop or tablespoon, portion the chilled dough into 1–1.5 tablespoon balls. Roll each portion gently between your palms to form smooth spheres. - Bake to Perfection
Arrange balls about 2 inches apart on prepared sheets. Bake one sheet at a time in the center rack for 10–12 minutes. The cookies are done when the edges are just set but the centers still appear soft and pale—they will continue firming as they cool. Avoid browning for the classic snowball look. - Cool and Apply the Snowy Dusting
Let cookies rest on the baking sheet for 5 minutes, then transfer to a wire rack. While still warm (but not hot), roll each cookie generously in powdered sugar. Once fully cooled (about 30 minutes), roll them again for a thick, even coating that stays put. Double-Rolling Secret: The first warm roll allows sugar to adhere and slightly melt; the second creates the fluffy, snow-like finish.
Essential Baking Tips and Troubleshooting
- Prevent Spreading: Always chill adequately; cold dough holds shape better.
- Achieve Maximum Softness: Don’t overbake—pull them early for a tender center.
- Even Sizing: Uniform balls ensure consistent baking.
- Oven Hot Spots: Rotate sheets halfway if your oven bakes unevenly.
- Common Problems Solved:
- Too crumbly? Add 1 teaspoon more cream next time.
- Too wet? Use less juicy berries or extend chill time.
- Flat cookies? Dough was too warm—chill longer.
Storage, Freezing, and Make-Ahead Strategies
These cookies store exceptionally well, making them ideal for holiday prep:
- Room Temperature: In an airtight container, up to 1 week. Separate layers with parchment to prevent sticking.
- Refrigerator: Up to 2 weeks; flavors often improve after a day or two.
- Freezer (Baked): Freeze undusted cookies up to 3 months. Thaw at room temperature, then dust with fresh powdered sugar.
- Freezer (Dough): Shape into balls, freeze on a tray, then store in bags. Bake from frozen, adding 1–2 minutes to time.
- Make-Ahead: Prepare dough up to 48 hours in advance and refrigerate.
Serving Ideas and Perfect Pairings
These snow clouds shine brightest when shared:
- Arrange on festive platters with other classics like gingerbread men, shortbread, or chocolate treats.
- Serve alongside hot beverages: cocoa, spiced tea, coffee, or eggnog.
- For dessert, crumble over vanilla ice cream or yogurt.
- Gift them in decorative tins, jars, or cellophane bags tied with ribbon—include a handwritten recipe card for extra charm.
Creative Variations to Explore
Once you’ve mastered the base recipe, try these twists:
- Nutty Version: Fold in 1/3 cup finely chopped toasted almonds or pecans.
- Citrus-Infused: Add zest of one lemon or orange to the dough.
- Chocolate-Dipped: Dip cooled cookies halfway in melted white chocolate.
- Jam-Filled: Flatten balls, add a dab of raspberry preserves in the center, seal, and bake.
- Spiced Holiday: Incorporate 1/4 teaspoon cinnamon or cardamom for warmth.
This Ultra-Soft Raspberry Christmas Snow Clouds recipe brings joy through its simplicity, beauty, and delicious flavor. Whether baking for family, friends, or yourself, these cookies capture the magic of the season in every tender, snowy bite. Happy baking!