
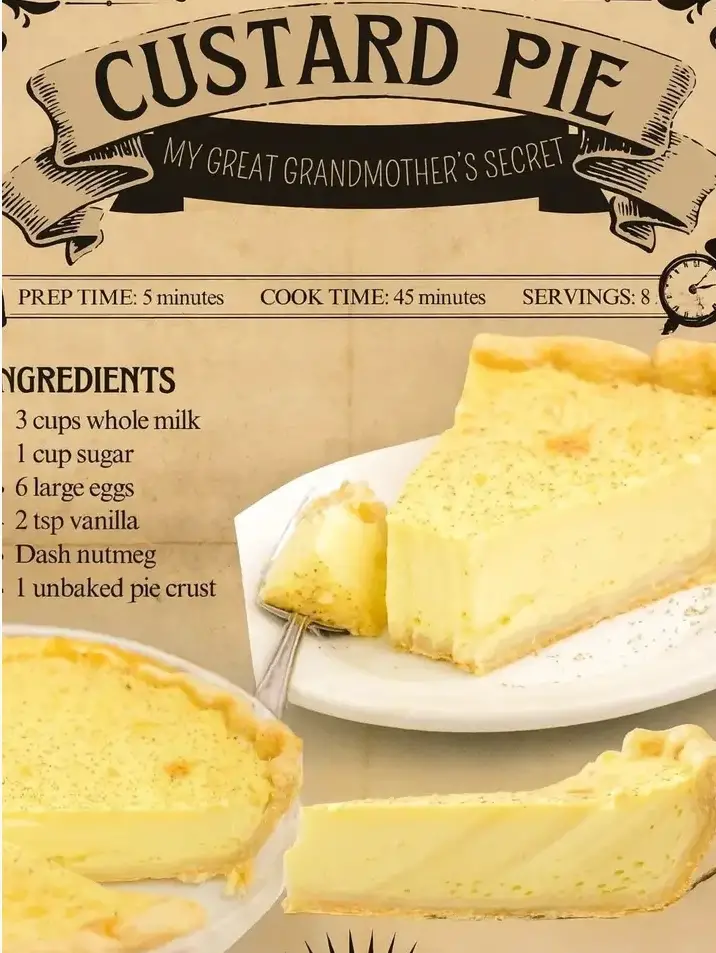
Classic Custard Pie – A Timeless Dessert That Never Goes Out of Style
Custard pie is one of those desserts that feels like a hug from the past — simple, sweet, and filled with a creamy, silky center that brings comfort with every bite. Long before elaborate multi-layered cakes and modern pastries filled bakery windows, custard pies graced the tables of home kitchens across generations. Known for their modest ingredient list and straightforward preparation, custard pies were a go-to dessert in many households, especially when pantry supplies were limited but something sweet was still desired.
The beauty of this pie lies in its balance — a flaky, buttery crust that holds a smooth, rich filling made from eggs, milk, sugar, and a gentle hint of spice. The nutmeg sprinkled on top doesn’t just add flavor; it also creates a warm aroma that fills the kitchen, instantly making the space feel inviting.
If you’ve never made a custard pie before, you’ll be pleasantly surprised at how easy it is to achieve that creamy texture and delicate sweetness. And if you have, this recipe will feel like meeting up with an old friend — familiar, comforting, and dependable.
A Brief History of Custard Pie
Custard as a concept has been around for centuries, dating back to the Middle Ages, when milk and eggs were combined to make both sweet and savory dishes. The idea of pouring a custard mixture into a pastry shell evolved over time, making its way into English and French kitchens before crossing the ocean to America. In the United States, custard pie gained particular popularity in rural areas because it required only a few basic ingredients — items that most farm families had on hand.
Today, custard pie holds a place alongside other classic pies like pumpkin, pecan, and apple. It’s a dessert that can be enjoyed year-round, whether you serve it chilled on a warm summer afternoon or alongside a cup of coffee on a crisp autumn evening.
Ingredients and Why They Matter
To make this pie perfect, every ingredient plays a role in flavor and texture.
- 1 unbaked pie crust – The crust acts as the foundation. You can use a homemade crust for a truly from-scratch pie, or a high-quality store-bought crust if you want a quicker version. The key is to start with it unbaked so the custard can cook along with it.
- 1 cup sugar – This sweetens the custard and helps the filling set properly. Granulated sugar is standard, but superfine sugar can dissolve even more smoothly.
- 6 large eggs, at room temperature – Eggs are the backbone of custard. They thicken the filling and give it that silky structure. Room temperature eggs mix more evenly with the milk, preventing curdling.
- ¼ teaspoon nutmeg – Nutmeg has a naturally warm, slightly sweet, and nutty aroma that pairs beautifully with the creamy custard base.
- 2 teaspoons vanilla – Vanilla enhances the flavor of the custard, giving it a deeper, richer taste.
- 3 cups whole milk, at room temperature – Whole milk is ideal for its fat content, which adds richness without making the filling heavy. Room temperature milk ensures the custard bakes evenly.
- ⅛ teaspoon nutmeg, for garnish – This final dusting not only adds visual appeal but also releases extra fragrance as the pie bakes.
Step-by-Step Instructions
Step 1: Preheat and Prepare the Crust
Preheat your oven to 350°F (175°C). Place the unbaked pie crust into a 9-inch pie dish. Crimp or flute the edges according to your preference — this not only makes the pie look beautiful but also helps hold in the filling. Set the prepared crust aside while you make the custard.
Step 2: Whisk the Eggs and Sugar
In a large mixing bowl, whisk together the sugar and eggs until the mixture is fully combined and slightly frothy. This step is important because whisking adds a little air, helping the custard become light without losing its creamy texture.
Step 3: Add Flavorings
Stir in the vanilla and ¼ teaspoon of nutmeg. These will infuse the custard with a sweet, warm depth that complements the dairy base.
Step 4: Incorporate the Milk
Slowly pour in the room temperature milk, whisking constantly to ensure the sugar dissolves completely and the eggs mix evenly. Adding milk gradually prevents shocking the eggs and causing lumps.
Step 5: Pour into the Crust
Carefully pour the custard mixture into the prepared pie crust, making sure it’s evenly distributed.
Step 6: Garnish with Nutmeg
Sprinkle the top with the remaining ⅛ teaspoon of nutmeg. This will create a lightly speckled surface and release a subtle spice aroma during baking.
Step 7: Bake to Perfection
Place the pie in the preheated oven and bake for 45–55 minutes, or until the center is just set. You can check doneness by inserting a thin knife near the center — it should come out mostly clean, with just a hint of moisture. This ensures the custard is fully cooked but still creamy.
Step 8: Cool and Chill
Allow the pie to cool completely at room temperature before refrigerating. Custard pies need time to set fully, so chilling for at least 2 hours is ideal. This step also makes slicing easier.
Tips for Success
- Preventing a Soggy Bottom: If you’re worried about the crust becoming soggy, you can blind bake it for 8–10 minutes before adding the custard. Just be careful not to overbake since it will continue cooking with the filling.
- Avoid Overbaking: Custard can crack if overcooked. Remove the pie when the center is slightly wobbly — it will firm up as it cools.
- Use Fresh Nutmeg: Freshly grated nutmeg has a stronger, more aromatic flavor than pre-ground. If possible, grate it yourself right before baking.
- Room Temperature Ingredients: This ensures the custard mixture blends smoothly without curdling.
Serving Suggestions
Custard pie is wonderful on its own, but you can dress it up with:
- A dollop of freshly whipped cream
- Fresh berries for a burst of color and tang
- A drizzle of caramel sauce for extra indulgence
- A sprinkle of cinnamon alongside the nutmeg for a slightly different spice profile
Storage and Make-Ahead
Custard pie should always be stored in the refrigerator. Cover loosely with plastic wrap or foil and enjoy within 3–4 days for the best flavor and texture. If making ahead for a gathering, prepare and bake the pie the day before, allowing it to chill overnight for easy slicing.
Variations to Try
- Coconut Custard Pie: Stir in 1 cup of sweetened shredded coconut before baking.
- Chocolate Custard Pie: Replace ½ cup of the milk with heavy cream and whisk in 4 ounces of melted semi-sweet chocolate.
- Citrus Custard Pie: Add 1 tablespoon of finely grated lemon or orange zest to the custard mixture for a bright, refreshing flavor.
- Spiced Custard Pie: Include a pinch of ground cinnamon, cloves, or cardamom along with the nutmeg for a deeper spice blend.
Troubleshooting Common Issues
- Custard is runny: This usually means it wasn’t baked long enough. Bake until the edges are set and the center is just slightly jiggly.
- Cracks in the custard: This happens from overbaking or baking at too high a temperature. Stick to 350°F and check early.
- Curdled texture: This can occur if the milk was added too quickly or the ingredients weren’t at room temperature. Always whisk slowly and gently.
Printable Recipe Card
Classic Custard Pie
Ingredients:
1 unbaked pie crust
1 cup sugar
6 large eggs, room temperature
¼ teaspoon nutmeg
2 teaspoons vanilla
3 cups whole milk, room temperature
⅛ teaspoon nutmeg (for garnish)
Instructions:
- Preheat oven to 350°F (175°C). Place pie crust in a 9-inch pie dish; crimp edges.
- Whisk sugar and eggs until combined and slightly frothy.
- Stir in vanilla and ¼ teaspoon nutmeg.
- Slowly whisk in milk until smooth.
- Pour mixture into crust; sprinkle with ⅛ teaspoon nutmeg.
- Bake 45–55 minutes, until center is just set.
- Cool completely, then refrigerate before serving.
Yield: 8 servings
If you’d like, I can also prepare a second version optimized for Google SEO, with keyword placement for “old-fashioned custard pie,” “easy custard pie recipe,” and “classic dessert pie,” so it ranks better online. That way, it’s not just long — it’s discoverable.