
How to Clean Tile Grout: Tested Methods for a Cleaner, Fresher Floor
Tile grout is one of those areas in the home that quietly collects dirt, soap scum, and grime over time until one day you look down and realize your once-pristine tiles are framed by dark, dingy lines. Grimy grout can make an entire floor or bathroom wall look dirty even if the tiles themselves are sparkling clean. The good news is that there are many methods to restore grout to a cleaner, brighter state. The challenge is figuring out which ones are actually effective, safe for your tile surface, and practical enough to use regularly.
With so much conflicting advice online, I decided to roll up my sleeves and put several grout-cleaning suggestions to the test. I selected three different approaches—fresh lemon juice, a homemade Oxiclean paste, and a sulfamic acid cleaner—so I could see for myself which ones delivered real results. Before beginning, I made sure to open a window to improve ventilation and put on a pair of rubber gloves to protect my skin from potential irritation. If you decide to try any of these methods yourself, I recommend performing a patch test in an inconspicuous area to ensure that there are no unwanted reactions with your tile or grout material. My grout is gray, so it was never going to be bright white, but the goal was to make it look significantly cleaner and more uniform.
Step 1: Fresh Lemon Juice
The first method I tried was the simplest and most natural. I took a fresh lemon, sliced it in half, and used the cut side as a scrubber, pressing it into the grout lines and letting the natural juice seep in. The acidity of lemon juice works as a mild bleaching agent and is often recommended for natural cleaning. After applying the lemon juice, I used a green Scotch-Brite pad to scrub the grout lines in small, circular motions. I noticed an immediate improvement as the surface grime began to lift.
Once I finished scrubbing, I wiped away the lemon pulp with a damp paper towel, which was the only mildly frustrating part of this method. Lemon juice is effective but slightly messy, and you will want to make sure to remove any leftover pulp so it does not dry and stick to the tile surface. After allowing the area to dry completely, the grout looked noticeably cleaner. It was not dramatically brighter, but the difference was significant enough to see that this was a viable option for someone who wants a natural, chemical-free cleaning method.
Step 2: Oxiclean Paste
The second method I tested involved Oxiclean, which is a popular oxygen-based cleaner often used to whiten clothes. To adapt it for grout cleaning, I created a runny paste by mixing Oxiclean powder with water in a 1-to-1 ratio. I stirred the mixture constantly as I worked, because Oxiclean can separate and harden if left sitting too long. Using an old spoon, I applied the paste directly onto the grout lines, ensuring good coverage.
I allowed the mixture to sit for about 5 to 10 minutes so that it could work its way into the porous grout. Then, I scrubbed the area with my Scotch-Brite pad. This method was very effective—probably the most satisfying of the three in terms of visual improvement. However, one drawback was that Oxiclean left behind a white, powdery residue on the tile surface. This meant I had to rinse the entire area thoroughly with water and then mop it well to remove the film. The additional rinsing step made this process slightly more labor-intensive, but the results were excellent. The grout appeared significantly lighter and cleaner, and the overall floor looked refreshed.
Step 3: Sulfamic Acid Cleaner
The third method was a sulfamic acid cleaner, which can be purchased at most home improvement stores. This is a stronger, more industrial option than lemon juice or Oxiclean, so it is important to follow all safety instructions carefully. I mixed the sulfamic acid crystals with warm water according to the manufacturer’s directions, spooned the solution directly onto the grout lines, and immediately noticed fizzing and bubbling as the cleaner reacted with the built-up grime.
I scrubbed the grout with the Scotch-Brite pad and noticed that the grout appeared darker right away. At first, this was alarming, as it seemed as though the cleaner had stained the grout rather than brightened it. However, as the area dried, the grout lightened considerably and ended up looking cleaner than before. This method was very effective but slightly more aggressive than the others, making it a good option for heavily soiled grout or areas that have not been cleaned in a long time.
Comparing the Results
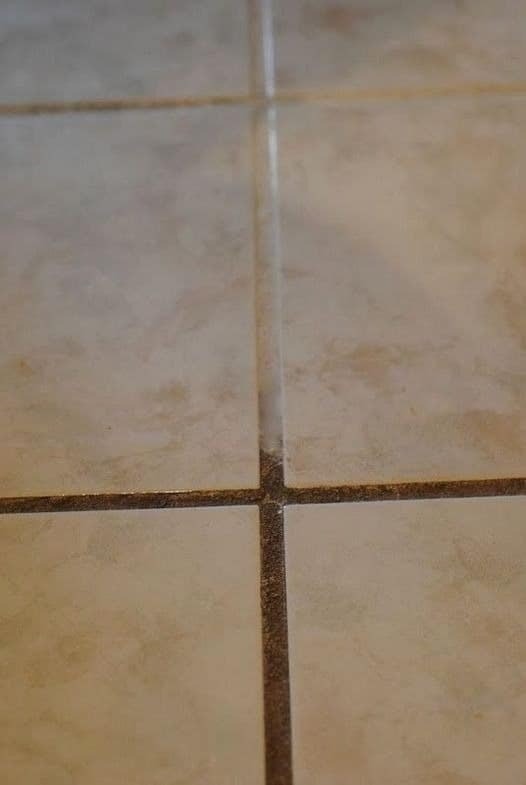
Each of the three methods delivered visible improvement, but they varied in terms of ease of use, messiness, and final appearance. The section cleaned with lemon juice was brighter and fresher looking but still had some deeper stains. The Oxiclean section looked the most consistently clean and uniform, although it did require additional rinsing. The sulfamic acid cleaner produced dramatic results, but because it is more caustic, I would reserve it for deep-cleaning sessions rather than routine maintenance.
Ultimately, Oxiclean emerged as the winner for me, with lemon juice as a close second—perfect for anyone seeking a natural solution without the need for harsher chemicals. Despite the extra step of rinsing and mopping, Oxiclean provided the most satisfying overall transformation, so I decided to use this method for the remainder of the bathroom. The end result was remarkable. Even though my gray grout will never look pure white, it looked significantly cleaner, and the entire floor appeared brighter and more inviting.
Tips for Success
If you are planning to clean your own grout, there are a few tips that can make the process easier and more effective. Always start with a patch test, especially if you are using a chemical cleaner, to ensure it will not damage your tile or discolor the grout. Work in small sections so that your cleaning solution does not dry before you have a chance to scrub. Use a stiff brush or pad that can get into the grout lines, but avoid anything too abrasive that might scratch your tile. After cleaning, rinse thoroughly with water to remove any remaining residue, and dry the area to prevent new dirt from settling into the still-damp grout.
Maintaining Cleaner Grout
Once you have gone through the work of deep cleaning your grout, you will want to keep it looking good for as long as possible. Sweeping or vacuuming your tile floor regularly helps prevent dirt from settling into the grout lines. Mopping with a mild cleaner once a week can also keep grime at bay. For even longer-lasting results, consider sealing your grout after cleaning. A good grout sealer will create a protective barrier that repels moisture, stains, and dirt, making future cleaning easier and reducing the frequency with which you need to do deep scrubs.
Final Thoughts
Grout cleaning is one of those chores that can make an immediate and dramatic difference in how clean your home feels. By testing three popular cleaning methods—fresh lemon juice, Oxiclean paste, and sulfamic acid cleaner—I was able to see firsthand which ones work best. While all three methods provided results, Oxiclean offered the best balance between effectiveness and practicality, leaving my grout looking refreshed and my bathroom noticeably brighter.
If you are tackling dirty grout in your own home, experiment with one or more of these techniques to find the one that works best for you. Whether you prefer the natural approach of lemon juice, the deep-cleaning power of oxygen bleach, or the industrial strength of sulfamic acid, there is a solution that can bring your grout back to life. Clean grout not only improves the appearance of your tile but also contributes to a healthier living environment by reducing the dirt, bacteria, and allergens that can collect in those small crevices.