
No-Sugar Oatmeal, Cocoa, and Banana Dessert Recipe: A Guilt-Free Treat You’ll Love
If you’ve been searching for a naturally sweet, wholesome dessert that won’t compromise your health goals or weight loss journey, this No-Sugar Oatmeal, Cocoa, and Banana Dessert is exactly what you need. Made with simple pantry staples and ripe bananas, it comes together in minutes and bakes into a soft, fudgy, cake-like treat that feels indulgent but is entirely guilt-free.
This healthy dessert is perfect for those following sugar-free diets, Weight Watchers SmartPoint plans, or simply anyone who wants to cut down on refined sugar without sacrificing taste or texture. The bananas provide natural sweetness, while the cocoa delivers deep, rich chocolate flavor, and the oats add satisfying structure and fiber.
Whether you’re craving a post-workout snack, a midday pick-me-up, or a wholesome family dessert, this recipe is a nourishing option that aligns with clean eating and smart portioning. Plus, it’s endlessly customizable—top it with banana slices, walnuts, or even a dusting of cinnamon, and you’ve got a dessert that’s not only healthy but beautiful too.
Let’s take a closer look at how to make this delicious, no-added-sugar dessert, step-by-step, and explore the benefits of each ingredient along the way.
Why Choose This No-Sugar Dessert?
In today’s world where processed sugars sneak into nearly every snack or dessert, finding a treat that truly contains no added sugar is a rare gem. This recipe is especially beneficial for:
- Those with blood sugar concerns like diabetes or insulin resistance
- People following a weight-loss plan such as Weight Watchers or SmartPoints
- Children who deserve tasty treats without sugar highs and crashes
- Anyone trying to reduce sugar intake without feeling deprived
What makes this recipe stand out is its natural sweetness from bananas, its richness from cocoa powder, and its wholesome fiber from oats. It doesn’t pretend to be a dessert—it is one, just without the drawbacks of sugar, butter, or processed flours.
Ingredients (with Notes)
Here’s a breakdown of the ingredients used, along with why they matter nutritionally and how they affect the texture and flavor of this dessert:
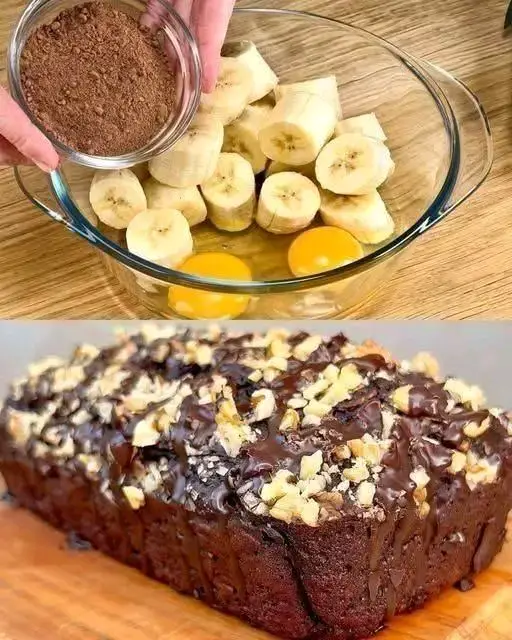
1. Ripe Bananas – 3 medium
The key to natural sweetness in this recipe, ripe bananas are loaded with flavor, potassium, and natural sugars like fructose and glucose. The riper, the better—they mash easily and infuse the dessert with moisture and sweetness. Bananas also act as a natural binder, helping replace added fats or flours.
2. Eggs – 2 large
Eggs provide structure, moisture, and richness, helping the dessert set properly. They also contain protein and healthy fats, which help with satiety. If you’re avoiding eggs, you could substitute flax eggs or use plant-based alternatives, but note the texture may be slightly different.
3. Unsweetened Cocoa Powder – 25 grams (about 1/4 cup)
Cocoa powder gives the dessert a decadent chocolate flavor without the need for sugar. Opt for unsweetened, high-quality cocoa powder—either natural or Dutch-processed—depending on your flavor preference. Cocoa is rich in antioxidants and adds a satisfying depth that balances the sweetness of the bananas.
4. Baking Powder (Optional) – 5 grams (about 1 teaspoon)
While optional, baking powder gives the dessert a lighter texture, helping it rise slightly during baking. If you like a denser, brownie-like dessert, feel free to omit it.
5. Rolled Oats – 50 grams (about 1/2 cup)
Oats add substance and structure while keeping the dessert whole-grain and gluten-free (if certified). They absorb the moisture from the bananas and eggs and hold everything together. You can increase or decrease the oats slightly depending on the texture you prefer—more oats for a firmer slice, fewer for a gooier texture.
6. Banana Slices or Nuts – For topping (optional)
Sliced bananas on top caramelize slightly during baking and add visual appeal. Nuts, such as chopped walnuts or pecans, provide healthy fats and crunch.
Step-by-Step Instructions
Step 1: Preheat the Oven
Set your oven to 350°F (175°C). Preheating ensures even baking and helps the dessert rise properly once inside the oven.
Step 2: Mash the Bananas
Peel and place your ripe bananas in a large mixing bowl. Use a fork or potato masher to mash them until they’re smooth and free of lumps. The mashed bananas should resemble thick applesauce.
Step 3: Add Eggs and Cocoa
Crack two eggs into the mashed bananas. Add the cocoa powder. Stir thoroughly with a spoon, whisk, or electric mixer until everything is completely blended. The batter should look rich and chocolatey.
Step 4: Add Baking Powder (Optional)
Sprinkle in the baking powder and stir well. This step is optional but recommended if you prefer a slightly airier, cake-like dessert. If you omit it, expect a denser, fudgier texture similar to a baked pudding or soft brownie.
Step 5: Incorporate the Oats
Gradually fold in the rolled oats. The mixture will thicken and become spoonable but not stiff. If it feels too wet, add an extra tablespoon or two of oats; if too dry, mash in a bit more banana or a splash of milk or water.
Step 6: Prepare Your Baking Dish
Grease a small baking dish or loaf pan with a bit of oil or line it with parchment paper to prevent sticking. You can also use muffin tins to make individual portions.
Step 7: Pour the Batter
Spoon the banana-oat-cocoa mixture into the prepared baking dish. Smooth the top with a spatula.
Step 8: Decorate (Optional)
Arrange banana slices, chopped nuts, or even unsweetened shredded coconut on top for decoration. This not only adds texture but also makes the finished product look inviting and homemade.
Step 9: Bake
Place the dish in the preheated oven and bake for 20–25 minutes. Begin checking at the 20-minute mark by inserting a toothpick or knife into the center—if it comes out mostly clean (a little moisture is fine), it’s done.
Step 10: Cool and Serve
Allow the dessert to cool for 10–15 minutes before slicing. This helps it firm up and makes cutting easier. Serve warm with a spoon or cold from the fridge the next day—it keeps well for up to 3 days when stored in an airtight container.
Serving Suggestions
This dessert is incredibly versatile. Here are some simple ways to enjoy it:
- With a dollop of plain Greek yogurt for added protein
- Sprinkled with a touch of cinnamon or nutmeg
- With fresh berries or a spoonful of nut butter
- Chilled, sliced, and served as an afternoon snack
It’s also great for meal prep—bake once, portion it into squares, and enjoy throughout the week.
Nutritional Benefits
This dessert offers a healthy blend of fiber, potassium, antioxidants, and protein, with no refined sugar, flour, or butter. Each serving is:
- Naturally sweetened with fruit
- Whole grain from oats
- Rich in magnesium and iron from cocoa
- High in satiating fiber and protein
It’s a recipe that not only satisfies your sweet tooth but also fuels your body in a balanced, sustainable way.
SmartPoints & Weight Loss Testimonial
This no-sugar oatmeal dessert fits beautifully within the Weight Watchers SmartPoint system. While specific point values can vary depending on the program year or changes in your custom plan, this recipe contains only whole, nutrient-dense ingredients, making it an excellent low-point option.
Here’s a personal experience that shows just how effective clean eating and portion awareness can be:
“I’ve followed the Smart Point Challenge Weight Watchers recipes in this book for over 6 weeks and lost 38 lbs. The book is great because it’s well-organized and clearly shows how much you can eat for the points. I highly recommend it for anyone doing the Smart Point Challenge in 2025.”
This simple dessert proves that you don’t need refined sugar, complicated ingredients, or store-bought alternatives to enjoy satisfying sweets. With whole ingredients and mindful preparation, you can eat well, feel full, and continue on your health journey without missing a beat.
Final Thoughts
This No-Sugar Oatmeal, Cocoa, and Banana Dessert is proof that healthy desserts can be delicious, easy, and truly nourishing. Whether you’re managing your weight, cutting back on sugar, or just looking for a better way to indulge, this recipe has you covered.
It’s easy to make, budget-friendly, naturally gluten-free, and customizable with your favorite add-ins. Keep it on hand for weeknight cravings, quick breakfasts, or a potluck offering that you can feel proud to serve.
Let your sweet tooth guide you—without the sugar crash that usually follows.