
Oreo Cream Cheese Cheesecake Sushi Roll
A playful, no‑bake dessert that combines the fun of sushi with the indulgence of cheesecake and Oreos.
Introduction
Dessert sushi might sound whimsical, but it’s one of those creative ideas that instantly sparks joy. Imagine the familiar roll shape of sushi, but instead of rice and fish, you get a luscious Oreo crust, creamy cheesecake filling, and a drizzle of chocolate. That’s exactly what this Oreo Cream Cheese Cheesecake Sushi Roll delivers.
It’s a no‑bake recipe, which means it’s approachable for all skill levels. It’s also a show‑stopper: perfect for parties, birthdays, or any occasion where you want to surprise guests with something unique. The roll slices into neat pinwheels that look elegant on a platter, yet the flavors are pure comfort — cookies, cream, and chocolate.
Ingredients Breakdown
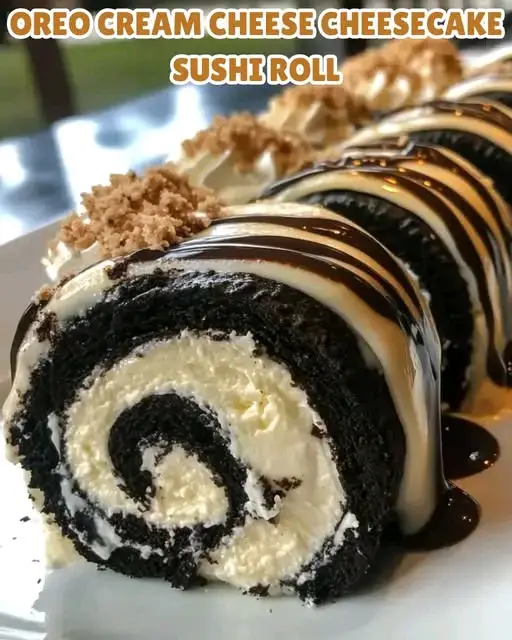
For the “Rice” Layer (Cheesecake Filling)
1 (8 oz) package cream cheese, softened – Smooth, tangy base that mimics the stickiness of sushi rice.
¼ cup powdered sugar – Sweetens and stabilizes the cream cheese.
½ teaspoon vanilla extract (optional) – Adds warmth and depth.
2 tablespoons heavy cream (optional) – Creates a silkier texture.
For the “Seaweed” Layer (Oreo Crust)
20 Oreo cookies – Crushed into fine crumbs to form the outer wrap.
3 tablespoons melted butter – Helps bind crumbs into a pliable crust.
For Garnish and Drizzle
½ cup chocolate chips, melted – Drizzled over rolls for extra indulgence.
Extra Oreo crumbs or sprinkles – For decoration.
Fresh fruit (optional) – Strawberries or raspberries add color and balance.
Step‑by‑Step Instructions
Step 1: Prepare the Oreo Crust
Crush Oreos into fine crumbs using a food processor or by sealing them in a bag and rolling with a pin. Mix with melted butter until the texture resembles wet sand. Spread onto parchment paper and press into a thin rectangle. Chill to firm up.
Step 2: Make the Cheesecake Filling
Beat softened cream cheese with powdered sugar until smooth. Add vanilla and cream if desired. The mixture should be thick yet spreadable.
Step 3: Assemble the Roll
Spread cheesecake filling evenly over the chilled Oreo crust, leaving a small border. Using parchment paper to guide you, roll tightly from one long edge into a log. Chill for at least 1 hour to set.
Step 4: Slice and Decorate
Slice into 1‑inch rounds with a sharp knife. Drizzle with melted chocolate and sprinkle with Oreo crumbs or festive toppings.
Why This Recipe Works
No‑bake simplicity: No oven required, just chilling.
Playful presentation: Sushi roll format makes dessert interactive.
Balanced flavors: Tangy cream cheese offsets sweet Oreos and chocolate.
Customizable: Easy to adapt with different fillings or toppings.
Tips for Success
Use parchment paper to help roll tightly.
Chill thoroughly before slicing to prevent smudging.
Wipe knife between cuts for clean slices.
Don’t overfill — too much cheesecake makes rolling difficult.
Variations
Matcha Cheesecake Sushi Roll: Add matcha powder to filling for a green tea twist.
Peanut Butter Oreo Roll: Mix peanut butter into cheesecake layer.
Fruit‑Filled Roll: Add thin slices of strawberries or bananas inside.
Holiday Version: Use red and green sprinkles for Christmas.
Mini Rolls: Make smaller logs for bite‑sized treats.
Serving Ideas
Arrange on a sushi platter with chopsticks for fun presentation.
Pair with hot chocolate or coffee.
Serve alongside fresh fruit for balance.
Use as a centerpiece dessert at parties.
Storage
Refrigerator: Store in airtight container up to 3 days.
Freezer: Freeze rolls for up to 1 month. Thaw slightly before serving.
Nutrition (per slice, approx.)
Calories: ~180
Protein: ~2g
Fat: ~10g
Carbs: ~20g
Conclusion
This Oreo Cream Cheese Cheesecake Sushi Roll is more than just a dessert — it’s an experience. Fun to make, delightful to serve, and delicious to eat, it’s the perfect recipe for anyone who loves playful twists on classic flavors. With its creamy filling, crunchy crust, and chocolate drizzle, it’s bound to become a favorite in your kitchen.