
Introduction
Twix Cookie Cups are the perfect marriage of buttery shortbread, gooey caramel, and smooth milk chocolate—all packed into an adorable, pop-in-your-mouth cookie cup.
These little treats deliver the iconic Twix flavor profile we all crave, but with the satisfaction of being 100 % homemade and infinitely customizable.
Whether you’re baking for a party, a holiday cookie tray, a school event, or simply a cozy night in, these cookie cups disappear faster than you can say “left hand or right hand.
Origin
The original Twix bar was launched in the United Kingdom in 1967 by Mars Limited under the name “Raider” before being rebranded as Twix in 1980 for the European market and 1979 for the U.S.
The name “Twix” is a playful portmanteau of “twin” and “biscuits” (or “twin sticks”), celebrating its signature two-finger format.
Homemade Twix-inspired recipes exploded on Pinterest and food blogs around 2014–2015 when bakers began experimenting with Twix millionaire’s shortbread and cookie bars, eventually leading to the genius mini cookie-cup format we enjoy today.
Cultural Significance
Twix has become more than just a candy bar—it’s a cultural icon of the 80s and 90s, immortalized in commercials featuring the eternal “left Twix vs. right Twix” debate that still sparks playful arguments.
In the age of social media, Twix Cookie Cups have taken TikTok, Instagram Reels, and Pinterest by storm, racking up millions of views under hashtags like #twixcookies and #cookiecups.
They represent the perfect intersection of nostalgia and modern baking trends: bite-sized, aesthetic, shareable, and undeniably indulgent—yet surprisingly simple to make at home.
Ingredients & Exact Quantities (makes 24 mini cookie cups)
For the Cookie Cups (shortbread base):
- ½ cup (113 g) unsalted butter, completely softened to room temperature
- ½ cup (100 g) granulated sugar
- 1 teaspoon pure vanilla extract
- 1 large egg white (save the yolk for another use or discard)
- 1 ½ cups (190 g) all-purpose flour, spooned and leveled
- 1 teaspoon baking powder
- Pinch of salt (optional but recommended for flavor balance)
For the Caramel Layer:
- 20 soft caramel candies (such as Kraft or Werther’s Original), unwrapped (about 160–170 g total)
- 1 tablespoon whole milk or heavy cream (cream yields richer results)
For the Chocolate Topping:
- 2 cups (340–360 g) good-quality milk chocolate chips or chopped milk chocolate (Ghirardelli, Guittard, or Callebaut recommended)
- 1 teaspoon neutral oil (optional, for extra shine and smoother spreading)
Optional Additions & Variations
- Add ¼ teaspoon flaky sea salt on top of the chocolate for “salted Twix” vibes.
- Swap ½ cup of the milk chocolate for dark chocolate (60–70 %) for a more grown-up flavor.
- Stir ⅓ cup finely chopped toasted pecans or peanuts into the caramel for a Snickers-Twix hybrid.
- Add ½ teaspoon espresso powder to the cookie dough for a subtle mocha note.
- Use dulce de leche instead of melted caramels for an even richer, more authentic South-American caramel taste.
- Make them gluten-free by using a 1:1 gluten-free baking flour blend.
- Turn them vegan with plant-based butter, flax egg white (1 tbsp ground flax + 2.5 tbsp water), vegan caramels, and dairy-free milk chocolate.
Tips for Success
- Do not overbake the cookie cups—remove them when they are puffy and no longer glossy, even if they look slightly underdone; they firm up as they cool.
- Grease your mini muffin tin very well (or use silicone liners) because caramel is sticky and unforgiving.
- Press a teaspoon or the back of a rounded measuring spoon into the center of each hot cookie cup immediately after baking to re-form the “cup” shape if it has puffed too much.
- Chill the caramel-filled cups for at least 10–15 minutes before adding chocolate; this prevents the layers from bleeding into each other.
- Temper your chocolate or add a tiny bit of coconut oil or neutral oil for a glossy, snappy finish that doesn’t melt at room temperature.
- Store in an airtight container at room temperature for up to 5 days, or refrigerate up to 2 weeks (let come to room temp before serving for best texture).
- Freeze baked and fully set cookie cups up to 3 months—perfect for holiday prep.
Step-by-Step Instructions (with extra detail for perfect results)
1. Prepare the Shortbread Dough
Preheat oven to 350°F (175°C) and thoroughly grease a 24-cup mini muffin tin.
In a stand mixer fitted with paddle attachment or with a hand mixer, cream softened butter and granulated sugar for 2–3 full minutes until pale, fluffy, and visibly lighter in color.
Scrape down the bowl, add vanilla extract and egg white, and beat until fully incorporated (about 30 seconds).
2. Incorporate Dry Ingredients
In a separate bowl, whisk together flour, baking powder, and optional salt.
Gradually add dry ingredients to the butter mixture on low speed until a soft dough forms—do not overmix once flour is added.
The dough should be soft but not sticky; if it’s too sticky, add 1–2 extra tablespoons of flour.
3. Shape the Cookie Cups
Lightly flour your work surface and rolling pin. Roll dough to between ¼ and ⅓ inch thickness.
Using a 2.5–3 inch round cookie cutter (or the rim of a glass), cut out 24 circles.
Gently press each circle into the mini muffin cups, pressing up the sides to form a cup shape. Patch any tears with excess dough.
4. Bake
Bake 7–9 minutes. The tops should look dry and slightly puffed but still very pale (they will firm as they cool).
Immediately upon removing from oven, use the back of a rounded teaspoon or a tart tamper to gently press the centers down again, reinforcing the cup shape.
Let cool in the pan 5 minutes, then carefully remove to a wire rack to cool completely.
5. Prepare the Caramel Layer
Place unwrapped caramels and milk (or cream) in a microwave-safe bowl.
Heat in 25–30 second bursts, stirring well after each, until completely smooth (usually 60–90 seconds total).
Let cool 2–3 minutes so it thickens slightly—this prevents it from soaking into the cookie.
6. Fill with Caramel
Spoon or pipe about 1–1.5 teaspoons of caramel into each cooled cookie cup, spreading gently to the edges.
Tap the entire tray lightly on the counter to level the caramel.
Refrigerate 10–15 minutes until caramel is set and no longer sticky to the touch.
7. Chocolate Topping
Place chocolate chips (and optional 1 tsp oil) in a microwave-safe bowl.
Heat in 20–30 second intervals, stirring thoroughly after each, until about 80 % melted.
Continue stirring off-heat until the remaining chips melt completely (this prevents overheating and blooming).
Spoon or pipe chocolate over the set caramel, smoothing with a small offset spatula or the back of a spoon.
Tap tray gently to level chocolate, then sprinkle with flaky salt if desired.
Let set at room temperature for 1–2 hours or refrigerate 20 minutes for faster setting.
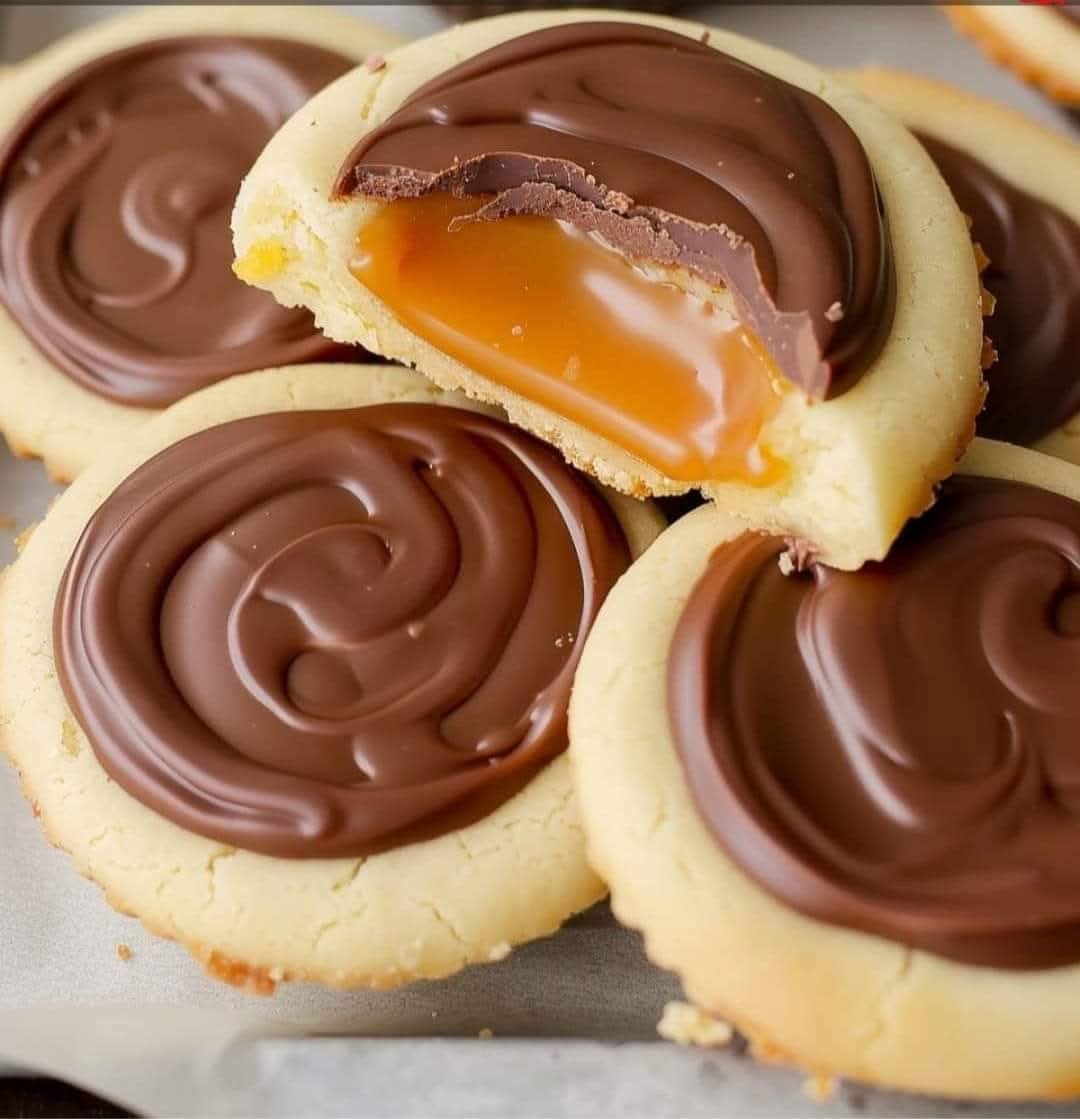
Description & Sensory Experience
The moment you bite into a Twix Cookie Cup, you’re greeted with a delicate snap of milk chocolate that quickly gives way to silky, buttery caramel oozing over a crisp-tender shortbread base.
The shortbread is buttery and slightly crumbly like the classic Twix biscuit, but with a fresher, more pronounced vanilla note because it’s homemade.
Each bite is perfectly proportioned—never overwhelmingly sweet, yet deeply satisfying in that “I could eat ten more” kind of way.
Nutritional Information (per cookie cup, based on 24 servings)
Calories: ≈ 180–190 kcal
Total Fat: 10 g
Saturated Fat: 6 g
Carbohydrates: 23 g
Sugars: 16 g
Protein: 2 g
(Note: exact values vary slightly depending on specific brands of chocolate and caramels used.)
Conclusion
Twix Cookie Cups are proof that the very best version of our favorite candy bars is often the one we make ourselves.
They capture every nostalgic flavor memory of tearing open a Twix wrapper while adding the pride and joy of homemade baking.
From casual weeknight treats to show-stopping holiday gifts, these little cups deliver big on happiness.
Recommendation
Make a double batch. Seriously. The first tray will vanish before the chocolate fully sets.
Package them in clear cellophane bags tied with ribbon for the cutest neighbor gifts, teacher appreciation treats, or party favors.
Keep a stash in the freezer for emergency chocolate-caramel cravings—because once you’ve had homemade, the store-bought version just won’t compare.
Embracing Healthful Indulgence
Yes, these are indulgent—but they’re made with real butter, real chocolate, and real caramel—ingredients that bring joy rather than guilt when enjoyed mindfully.
Portion control is built in with the mini size, and using high-quality ingredients means deeper satisfaction in fewer bites.
Life is too short for sad desk snacks. Bake the Twix Cookie Cups, share them freely, and savor every buttery, caramel-drenched, chocolate-coated moment.